コラム


はじめに
こんにちはクラウドCoEの城前です。
今回はSagemaker Studioのライフサイクル設定を利用しノートブックのidle状態が一定時間以上続いたら自動シャットダウンを行う方法について紹介していきます。(紛らわしいですが、Sagemakerのノートブックインスタンスではありません)
SageMaker Studioを使っているとインスタンスを明示的に立ち上げる必要がないので、シャットダウンをするのを忘れてインスタンスが起動したままとなり、無駄なコストが発生してしまいがちです。そのようなことがないように今回ご紹介する方法を活用していただければ幸いです。
ライフサイクル設定とは
ライフサイクル設定は、新しい SageMaker Studio ノートブックの開始など、SageMaker Studioライフサイクル イベントによってトリガーされるシェルスクリプトです。ライフサイクル構成を使用して、SageMaker Studio ノートブック起動時に自動でカスタムパッケージのインストール、ノートブック拡張機能の構成、データセットの事前読み込み、ソースコードリポジトリの設定等を行う事ができます。
これまではライフサイクル設定の作成やSageMaker Studioドメインまたは個々のユーザーへのアタッチはAWS CLI(またはAWS SDK)を使用してして設定する必要がありましたが、2022年11月30日のアップデート以降、AWSマネジメントコンソールからも設定可能となっているようでした。
今回はこのライフサイクル設定を利用して、JupyterServerの起動時に拡張機能を自動的にインストールし、SageMaker Studio ノートブックの自動シャットダウン設定を行ってみたいと思います。
サンプルスクリプト
ライフサイクル設定で利用するスクリプトはAWS公式から提供されているサンプルスクリプトをそのまま利用します。
Jupyter Lab 3.0 では、拡張機能をインストールする前に “studio” conda 環境を activate する必要がありますが、サンプルスクリプトではJupyter Lab 3.0 の場合のみ “studio” conda 環境を activate する処理が記述されています。そのためJupyter Lab 1.o、Jupyter Lab 3.0の両バージョンで動作可能となっています。
※「TIMEOUT_IN_MINS」の変数でidle時間を設定しています。環境に合わせて適宜変更してください。(デフォルトは120分)
install-autoshutdown.sh
#!/bin/bash
# This script installs the idle notebook auto-checker server extension to SageMaker Studio
# The original extension has a lab extension part where users can set the idle timeout via a Jupyter Lab widget.
# In this version the script installs the server side of the extension only. The idle timeout
# can be set via a command-line script which will be also created by this create and places into the
# user's home folder
#
# Installing the server side extension does not require Internet connection (as all the dependencies are stored in the
# install tarball) and can be done via VPCOnly mode.

set -eux

# timeout in minutes
export TIMEOUT_IN_MINS=120

# Should already be running in user home directory, but just to check:
cd /home/sagemaker-user

# By working in a directory starting with ".", we won't clutter up users' Jupyter file tree views
mkdir -p .auto-shutdown

# Create the command-line script for setting the idle timeout
cat > .auto-shutdown/set-time-interval.sh << EOF
#!/opt/conda/bin/python
import json
import requests
TIMEOUT=${TIMEOUT_IN_MINS}
session = requests.Session()
# Getting the xsrf token first from Jupyter Server
response = session.get("http://localhost:8888/jupyter/default/tree")
# calls the idle_checker extension's interface to set the timeout value
response = session.post("http://localhost:8888/jupyter/default/sagemaker-studio-autoshutdown/idle_checker",
            json={"idle_time": TIMEOUT, "keep_terminals": False},
            params={"_xsrf": response.headers['Set-Cookie'].split(";")[0].split("=")[1]})
if response.status_code == 200:
    print("Succeeded, idle timeout set to {} minutes".format(TIMEOUT))
else:
    print("Error!")
    print(response.status_code)
EOF
chmod +x .auto-shutdown/set-time-interval.sh

# "wget" is not part of the base Jupyter Server image, you need to install it first if needed to download the tarball
sudo yum install -y wget
# You can download the tarball from GitHub or alternatively, if you're using VPCOnly mode, you can host on S3
wget -O .auto-shutdown/extension.tar.gz https://github.com/aws-samples/sagemaker-studio-auto-shutdown-extension/raw/main/sagemaker_studio_autoshutdown-0.1.5.tar.gz

# Or instead, could serve the tarball from an S3 bucket in which case "wget" would not be needed:
# aws s3 --endpoint-url [S3 Interface Endpoint] cp s3://[tarball location] .auto-shutdown/extension.tar.gz

# Installs the extension
cd .auto-shutdown
tar xzf extension.tar.gz
cd sagemaker_studio_autoshutdown-0.1.5

# Activate studio environment just for installing extension
export AWS_SAGEMAKER_JUPYTERSERVER_IMAGE="${AWS_SAGEMAKER_JUPYTERSERVER_IMAGE:-'jupyter-server'}"
if [ "$AWS_SAGEMAKER_JUPYTERSERVER_IMAGE" = "jupyter-server-3" ] ; then
    eval "$(conda shell.bash hook)"
    conda activate studio
fi;
pip install --no-dependencies --no-build-isolation -e .
jupyter serverextension enable --py sagemaker_studio_autoshutdown
if [ "$AWS_SAGEMAKER_JUPYTERSERVER_IMAGE" = "jupyter-server-3" ] ; then
    conda deactivate
fi;

# Restarts the jupyter server
nohup supervisorctl -c /etc/supervisor/conf.d/supervisord.conf restart jupyterlabserver

# Waiting for 30 seconds to make sure the Jupyter Server is up and running
sleep 30

# Calling the script to set the idle-timeout and active the extension
/home/sagemaker-user/.auto-shutdown/set-time-interval.sh
設定方法(AWS CLI編)
CloudShell等で以下のコマンドを実行し設定を行います。※SageMaker ドメインは事前に作成済みであるものとします。
スクリプトの形式変換
作成したスクリプトをbase64 形式に変換します。変換することによって、スペースや改行のエンコードによって発生するエラーが防止されます。
$ vi install-autoshutdown.sh
$ LCC_CONTENT=`openssl base64 -A -in install-autoshutdown.sh`
ライフサイクル設定作成
関連するJupyter Serverアプリケーションの起動時に実行されるSagemaker Studio ライフサイクル構成を作成します。
※コマンド実行後に出力されるライフサイクル構成のARN(StudioLifecycleConfigArn)はドメインの関連付け実施時に必要な情報となります。
$ aws sagemaker create-studio-lifecycle-config \
 --studio-lifecycle-config-name install-autoshutdown-extension \
 --studio-lifecycle-config-content $LCC_CONTENT \
 --studio-lifecycle-config-app-type JupyterServer
ドメインへの関連付け
ドメインIDの確認を行います。
$ aws sagemaker list-domains
ドメインの関連付けを行います。
$ aws sagemaker update-domain --domain-id <DOMAIN-ID> \
 --default-user-settings '{
 "JupyterServerAppSettings": {
   "DefaultResourceSpec": {
     "LifecycleConfigArn": "<STUDIO-LIFECYCLE-CONFIG-ARN>",
     "InstanceType": "system"
    },
    "LifecycleConfigArns": [
      "<STUDIO-LIFECYCLE-CONFIG-ARN>"
    ]
 }}'
設定は以上となります。
設定方法(AWSマネジメントコンソール編)
AWSマネジメントコンソールから設定を行います。※SageMaker ドメインは事前に作成済みであるものとします。
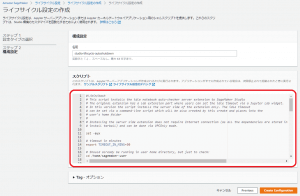
ライフサイクル設定作成
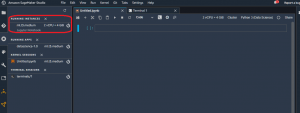
左メニューの「ライフサイクル設定」から「Studio」タブを選択しライフサイクル設定の作成を行っていきます。

「Jupyter Serverアプリケーション」を選択します。

スクリプトを張り付けライフサイクル設定を作成します。
※コード内にキャリッジリターン (CR)が含まれているとスクリプトの実行時にエラーとなってしまうので注意してください。
ドメインへの関連付け
対象ドメインの「環境」タブから、作成したライフサイクル設定をアタッチし関連付けを行います。さらにデフォルトで実行するよう設定を行います。

設定は以上となります。
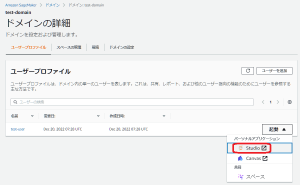
動作確認
実際にテスト用のユーザプロファイルを作成し動作確認を行ってみます。(今回はJupyter Lab 1.0で作成しています)
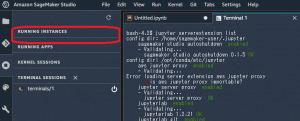
まずはアプリケーションの起動を行います。
起動後しばらくするとJupyter Notebookが起動していることが確認できます。
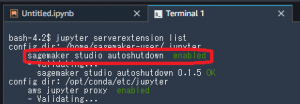
ターミナルから「jupyter serverextension list」コマンドで、sagemaker_studio_autoshutdownの項目がenabledになっていることが確認できます。
この状態でIdle時間(デフォルトでは120分)が経過するまで放置します。
Idle時間経過後、自動的にアプリケーションが停止されていることが確認できました。

以上です。
皆様の参考になれば幸いです。
-
PICK UP
ピックアップ
-
ピックアップコンテンツがありません
-
RANKING
人気の記事
-
-
1
AWSのその構成、一緒に見直してみませんか vol…
AWSのその構成、一緒に見直してみませんか vol.1
2023/01/15
-
2

DevOps、その遙かなる道程(第2回)
DevOps、その遙かなる道程(第2回)
2019/08/30
-
3

ECSを理解する(第2回)
ECSを理解する(第2回)
2020/12/02
-
4

SageMaker Studioのライフサイクル設…
SageMaker Studioのライフサイクル設定による自動シャットダウン
2022/12/20
-
5
Lambdaのマルチアカウントデプロイ 構築編
Lambdaのマルチアカウントデプロイ 構築編
2021/03/26
-

-
ARCHIVE
アーカイブ
-
- January 2024 (1)
- December 2023 (2)
- June 2023 (2)
- May 2023 (1)
- April 2023 (1)
- March 2023 (2)
- February 2023 (2)
- January 2023 (1)
- December 2022 (2)
- October 2022 (2)
- September 2022 (2)
- August 2022 (1)