コラム
こんにちは。DX事業部の中山です。
今回は、EKSでノードオートスケーラーとしてKarpenterを試した際の手順と結果について書いていきたいと思います。
Karpenterとは
Karpenter は、2021/11/29(米国時間) にGAされた OSS製のNodeレベルのオートスケーラーです。
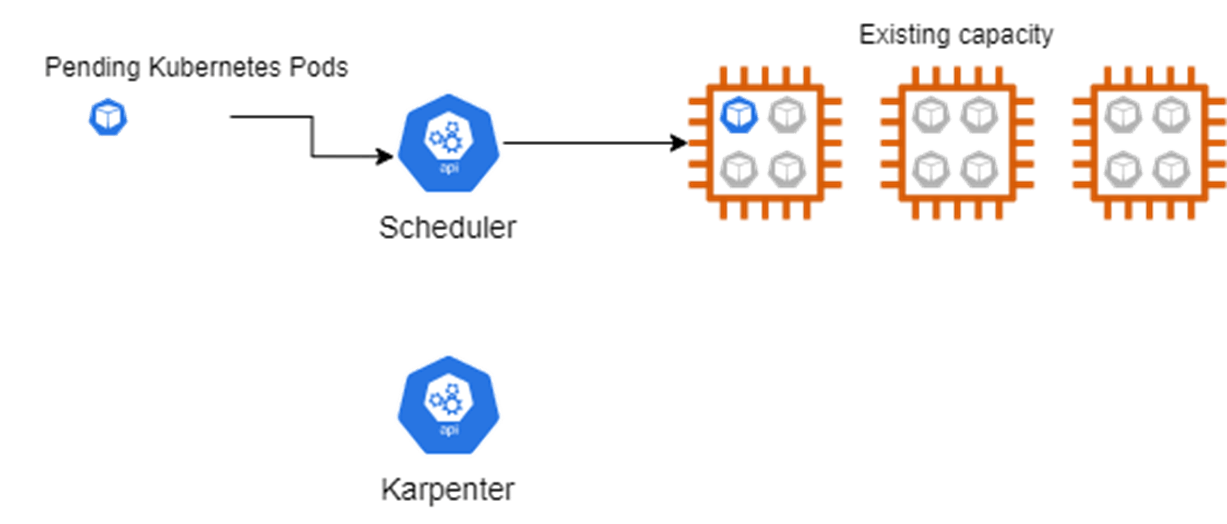
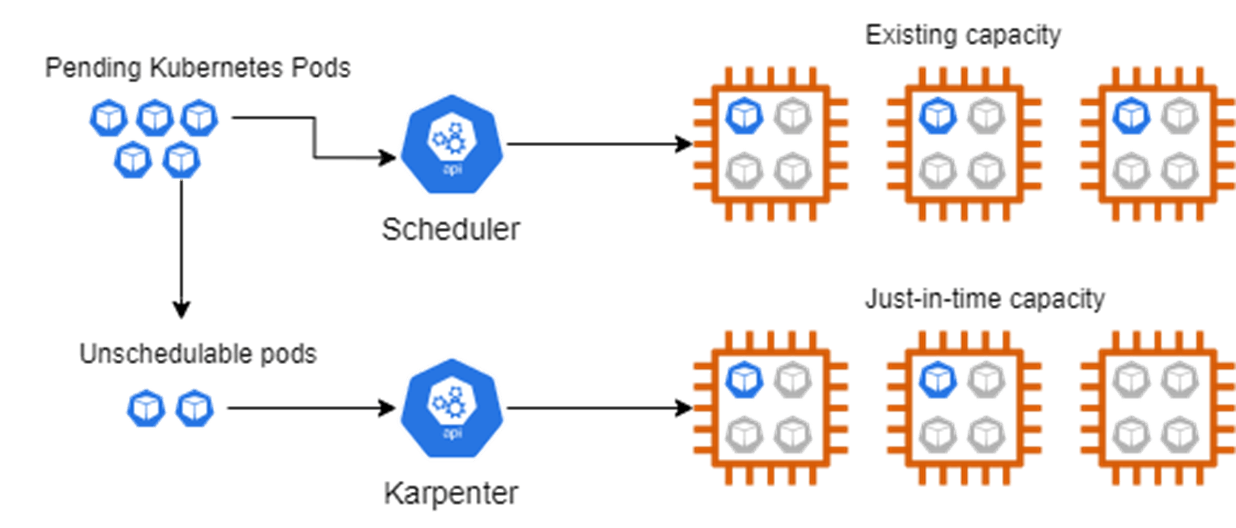
スケジュールされていないPodのリクエストを監視し、プロバイダーのコンピューティングサービス(AWS EC2等)と直接連携し、Podを実行するために必要最小限のコンピューティングリソースを起動させます。
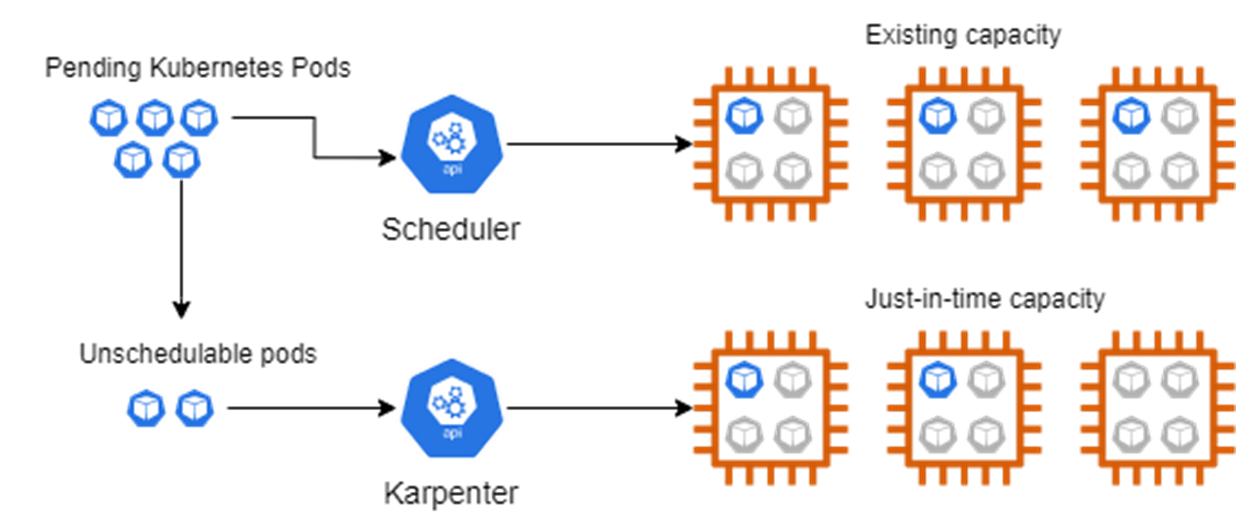
Kubernetesには、既にNodeレベルのオートスケーラーとしてCluster Autoscaler というアドオンが用意されていますが、そちらと比較してスケール速度の向上や、インスタンスタイプが必要量にあわせて動的に選択されるようになる等の利点があります。
それでは、実際に導入・検証を行います。
本記事の前提
- VPC と Subnet、SecurityGroup 等のリソースは作成済み。
- EKSクラスター作成済み。
- EKSの操作はCloud9から実行。
- OIDCプロバイダー作成済み。
- ClusterAutoScaler導入済み。
Version
- EKS: v1.22
- kubectl: 1.22.6
- cluster-autoscaler: v1.21.0
- Karpenter: v0.10.1
IAMロールの作成
まず、KarpenterとKarpenterコントローラーでプロビジョニングされたノード用に2つの新しいIAMロールを作成します。
以下のコマンドを実行して、IAMポリシーを作成します。
echo '{
    "Version": "2012-10-17",
    "Statement": [
        {
            "Effect": "Allow",
            "Principal": {
                "Service": "ec2.amazonaws.com"
            },
            "Action": "sts:AssumeRole"
        }
    ]
}' > node-trust-policy.json


aws iam create-role --role-name KarpenterInstanceNodeRole \
    --assume-role-policy-document file://node-trust-policy.json
次に、先ほど作成したIAMポリシーをIAMロールに紐づけます。
aws iam attach-role-policy --role-name KarpenterInstanceNodeRole \
    --policy-arn arn:aws:iam::aws:policy/AmazonEKSWorkerNodePolicy


aws iam attach-role-policy --role-name KarpenterInstanceNodeRole \
    --policy-arn arn:aws:iam::aws:policy/AmazonEKS_CNI_Policy


aws iam attach-role-policy --role-name KarpenterInstanceNodeRole \
    --policy-arn arn:aws:iam::aws:policy/AmazonEC2ContainerRegistryReadOnly


aws iam attach-role-policy --role-name KarpenterInstanceNodeRole \
    --policy-arn arn:aws:iam::aws:policy/AmazonSSMManagedInstanceCore
IAMロールをインスタンスプロファイルにアタッチします。
aws iam create-instance-profile \
    --instance-profile-name KarpenterInstanceProfile


aws iam add-role-to-instance-profile \
    --instance-profile-name KarpenterInstanceProfile \
    --role-name KarpenterInstanceNodeRole
次に、Karpenterコントローラーが新しいインスタンスをプロビジョニングするために使用するIAMロールを作成する必要があります。コントローラーは、OIDCエンドポイントを必要とするサービスアカウントのIAMロール(IRSA)を使用します。
まずは変数を設定します。
CLUSTER_NAME=sample-1-22


CLUSTER_ENDPOINT="$(aws eks describe-cluster \
    --name ${CLUSTER_NAME} --query "cluster.endpoint" \
    --output text)"
OIDC_ENDPOINT="$(aws eks describe-cluster --name ${CLUSTER_NAME} \
    --query "cluster.identity.oidc.issuer" --output text)"
AWS_ACCOUNT_ID=$(aws sts get-caller-identity --query 'Account' \
    --output text)
先程設定した変数を使用して、IAMロール、インラインポリシーを作成します。
echo "{
    \"Version\": \"2012-10-17\",
    \"Statement\": [
        {
            \"Effect\": \"Allow\",
            \"Principal\": {
                \"Federated\": \"arn:aws:iam::${AWS_ACCOUNT_ID}:oidc-provider/${OIDC_ENDPOINT#*//}\"
            },
            \"Action\": \"sts:AssumeRoleWithWebIdentity\",
            \"Condition\": {
                \"StringEquals\": {
                    \"${OIDC_ENDPOINT#*//}:aud\": \"sts.amazonaws.com\",
                    \"${OIDC_ENDPOINT#*//}:sub\": \"system:serviceaccount:karpenter:karpenter\"
                }
            }
        }
    ]
}" > controller-trust-policy.json


aws iam create-role --role-name KarpenterControllerRole-${CLUSTER_NAME} \
    --assume-role-policy-document file://controller-trust-policy.json


echo '{
    "Statement": [
        {
            "Action": [
                "ssm:GetParameter",
                "iam:PassRole",
                "ec2:RunInstances",
                "ec2:DescribeSubnets",
                "ec2:DescribeSecurityGroups",
                "ec2:DescribeLaunchTemplates",
                "ec2:DescribeInstances",
                "ec2:DescribeInstanceTypes",
                "ec2:DescribeInstanceTypeOfferings",
                "ec2:DescribeAvailabilityZones",
                "ec2:DeleteLaunchTemplate",
                "ec2:CreateTags",
                "ec2:CreateLaunchTemplate",
                "ec2:CreateFleet"
            ],
            "Effect": "Allow",
            "Resource": "*",
            "Sid": "Karpenter"
        },
        {
            "Action": "ec2:TerminateInstances",
            "Condition": {
                "StringLike": {
                    "ec2:ResourceTag/Name": "*karpenter*"
                }
            },
            "Effect": "Allow",
            "Resource": "*",
            "Sid": "ConditionalEC2Termination"
        }
    ],
    "Version": "2012-10-17"
}' > controller-policy.json


aws iam put-role-policy --role-name KarpenterControllerRole-${CLUSTER_NAME} \
    --policy-name KarpenterControllerPolicy-${CLUSTER_NAME} \
    --policy-document file://controller-policy.json
サブネットとセキュリティグループにタグを追加
Karpenterが使用するサブネットを認識できるように、ノードグループのサブネットにタグを追加する必要があります。
下記のコマンドを実行してノードグループのサブネットにタグを追加します。
for NODEGROUP in $(aws eks list-nodegroups --cluster-name ${CLUSTER_NAME} \
    --query 'nodegroups' --output text); do aws ec2 create-tags \
        --tags "Key=karpenter.sh/discovery,Value=${CLUSTER_NAME}" \
        --resources $(aws eks describe-nodegroup --cluster-name ${CLUSTER_NAME} \
        --nodegroup-name $NODEGROUP --query 'nodegroup.subnets' --output text )
done


NODEGROUP=$(aws eks list-nodegroups --cluster-name ${CLUSTER_NAME} \
    --query 'nodegroups[0]' --output text)


LAUNCH_TEMPLATE=$(aws eks describe-nodegroup --cluster-name ${CLUSTER_NAME} \
    --nodegroup-name ${NODEGROUP} --query 'nodegroup.launchTemplate.{id:id,version:version}' \
    --output text | tr -s "\t" ",")


SECURITY_GROUPS=$(aws ec2 describe-launch-template-versions \
    --launch-template-id ${LAUNCH_TEMPLATE%,*} --versions ${LAUNCH_TEMPLATE#*,} \
    --query 'LaunchTemplateVersions[0].LaunchTemplateData.SecurityGroupIds' \
    --output text)


aws ec2 create-tags \
    --tags "Key=karpenter.sh/discovery,Value=${CLUSTER_NAME}" \
    --resources ${SECURITY_GROUPS}
ConfigMap aws-authを更新
作成したIAMロールを使用しているノードがクラスターに参加できるようにする必要があります。これを実施するために、ConfigMap aws-authを更新します。
下記のコマンドを実行してConfigMap aws-authを更新します。
kubectl edit configmap aws-auth -n kube-system
下記をmapRolesに追加します。${AWS_ACCOUNT_ID}は自身のAWS のアカウントIDに置き換えています。
    - groups:
      - system:bootstrappers
      - system:nodes
      rolearn: arn:aws:iam::${AWS_ACCOUNT_ID}:role/KarpenterInstanceNodeRole
      username: system:node:{{EC2PrivateDNSName}}
Karpenterのデプロイ
Helmを使用して、Karpenterをクラスターにデプロイします。
チャートをインストールする前に、リポジトリをHelmに追加する必要があります。次のコマンドを実行して、リポジトリを追加します。
helm repo add karpenter https://charts.karpenter.sh/
helm repo update
まず、デプロイするKarpenterリリースを設定します。
バージョンは公式のkarpenterのリポジトリを確認ください。
export KARPENTER_VERSION=v0.10.1
下記コマンドを実施して、karpenterのマニフェストファイルを作成します。
helm template --namespace karpenter \
    karpenter karpenter/karpenter \
    --set aws.defaultInstanceProfile=KarpenterInstanceProfile \
    --set clusterEndpoint="${CLUSTER_ENDPOINT}" \
    --set clusterName=${CLUSTER_NAME} \
    --set serviceAccount.annotations."eks\.amazonaws\.com/role-arn"="arn:aws:iam::${AWS_ACCOUNT_ID}:role/KarpenterControllerRole-${CLUSTER_NAME}" \
    --version ${KARPENTER_VERSION} > karpenter.yaml
マニフェストファイルを編集して、Karpenterが既存のノードグループの1つで実行されるように、アフィニティを変更します。
      affinity:
        nodeAffinity:
          requiredDuringSchedulingIgnoredDuringExecution:
            nodeSelectorTerms:
            - matchExpressions:
              - key: karpenter.sh/provisioner-name
                operator: DoesNotExist
            - matchExpressions:
              - key: eks.amazonaws.com/nodegroup
                operator: In
                values:
                - ${NODEGROUP}
karpenterというnamespaceを作成します。
kubectl create namespace karpenter
CRDを作成します。
kubectl create -f \
    https://raw.githubusercontent.com/aws/karpenter/${KARPENTER_VERSION}/charts/karpenter/crds/karpenter.sh_provisioners.yaml
最後に下記を実行して、Karpenterをクラスターにデプロイします。
kubectl apply -f karpenter.yaml
provisionerを作成
Karpenterがスケジュールされていないワークロードに必要なノードのタイプを認識できるように、provisionerを作成する必要があります。
下記のようにprovisioner作成用のマニフェストファイルを作成します。プロビジョニングの条件や制約等を指定します。インスタンスタイプや、インスタンスのサイズ等を細かく指定できます。
karpenter-provisioner.yaml
apiVersion: karpenter.sh/v1alpha5
kind: Provisioner
metadata:
  name: default
spec:
  requirements:
    - key: karpenter.sh/capacity-type
      operator: In
      values: ['on-demand']
    - key: 'node.kubernetes.io/instance-type'
      operator: In
      values:
        [
          'r5.large',
        ]
  limits:
    resources:
      cpu: 10
      memory: 80Gi
  provider:
    subnetSelector:
      karpenter.sh/discovery: sample-1-22
    securityGroupSelector:
      karpenter.sh/discovery: sample-1-22
  ttlSecondsAfterEmpty: 30
  ttlSecondsUntilExpired: 600
下記コマンドを実施して、provisionerを作成します。
kubectl apply -f karpenter-provisioner.yaml
導入についてはこれで完了となります。
ClusterAutoScalerの停止
私が検証したEKS環境では、既にClusterAutoScalerを導入していたため、ClusterAutoScalerのpod数を0にすることで停止させます。
下記のコマンドを実行します。
kubectl scale deploy/cluster-autoscaler -n kube-system --replicas=0
動作確認
既存のワーカーノードは3台なので、高スペックのpodを立てて、ノードがスケールアウトされることを確認します。
$ kubectl get node
NAME                                              STATUS   ROLES    AGE   VERSION
ip-10-99-13-40.ap-northeast-1.compute.internal    Ready    <none>   42d   v1.22.6-eks-b18cdc9
ip-10-99-17-198.ap-northeast-1.compute.internal   Ready    <none>   42d   v1.22.6-eks-b18cdc9
ip-10-99-22-103.ap-northeast-1.compute.internal   Ready    <none>   42d   v1.22.6-eks-b18cdc9
高スペックのpodとして、alpineコンテナでスリープするだけのものをデプロイします。初期状態はレプリカ数を1とします。コンテナのスペックはcpu: 1, memory: 2048Miとします。
high-spec.yaml
kind: Deployment
apiVersion: apps/v1
metadata:
  name: app
  labels:
    app.kubernetes.io/name: app
spec:
  replicas: 1
  selector:
    matchLabels:
      app.kubernetes.io/name: app
  template:
    metadata:
      name: app
      labels:
        app.kubernetes.io/name: app
    spec:
      containers:
        - name: app
          image: alpine:latest
          command: [sh, -c, "sleep infinity"]
          resources:
            requests:
              cpu: 1
              memory: 2048Mi
まずは、レプリカ数を1として、podを起動させます。この段階では、スペックが足りている状態なのでノードは3台のままです。
$ kubectl get pod
NAME                                               READY   STATUS    RESTARTS   AGE
app-6f57fc7d5c-rcw8t                               1/1     Running   0          85s
datadog-agent-5vx8r                                3/3     Running   0          7d18h
datadog-agent-5xrdf                                3/3     Running   0          7d18h
datadog-agent-cluster-agent-85cf48cf-77kkh         1/1     Running   0          7d18h
datadog-agent-f9zfj                                3/3     Running   0          7d18h
datadog-agent-kube-state-metrics-fb456b9bf-jbdnw   1/1     Running   0          14d


$ kubectl get node
NAME                                              STATUS   ROLES    AGE   VERSION
ip-10-99-13-40.ap-northeast-1.compute.internal    Ready    <none>   42d   v1.22.6-eks-b18cdc9
ip-10-99-17-198.ap-northeast-1.compute.internal   Ready    <none>   42d   v1.22.6-eks-b18cdc9
ip-10-99-22-103.ap-northeast-1.compute.internal   Ready    <none>   42d   v1.22.6-eks-b18cdc9


$ kubectl describe pod app-6f57fc7d5c-rcw8t
Name:         app-6f57fc7d5c-rcw8t
Namespace:    default
Priority:     0
Node:         ip-10-99-22-103.ap-northeast-1.compute.internal/10.99.22.103
Start Time:   Fri, 27 May 2022 02:59:48 +0000
Labels:       app.kubernetes.io/name=app
              pod-template-hash=6f57fc7d5c
Annotations:  kubernetes.io/psp: eks.privileged
Status:       Running
IP:           10.99.20.37
IPs:
  IP:           10.99.20.37
Controlled By:  ReplicaSet/app-6f57fc7d5c
Containers:
  app:
    Container ID:  containerd://fe10d3d906ed791e7ded212e34415b9b004abd8c72884f8c89b1e94e34770b9b
    Image:         alpine:latest
    Image ID:      docker.io/library/alpine@sha256:686d8c9dfa6f3ccfc8230bc3178d23f84eeaf7e457f36f271ab1acc53015037c
    Port:          <none>
    Host Port:     <none>
    Command:
      sh
      -c
      sleep infinity
    State:          Running
      Started:      Fri, 27 May 2022 02:59:50 +0000
    Ready:          True
    Restart Count:  0
    Requests:
      cpu:        1
      memory:     2Gi
    Environment:  <none>
    Mounts:
      /var/run/secrets/kubernetes.io/serviceaccount from kube-api-access-5kwtf (ro)
Conditions:
  Type              Status
  Initialized       True
  Ready             True
  ContainersReady   True
  PodScheduled      True
Volumes:
  kube-api-access-5kwtf:
    Type:                    Projected (a volume that contains injected data from multiple sources)
    TokenExpirationSeconds:  3607
    ConfigMapName:           kube-root-ca.crt
    ConfigMapOptional:       <nil>
    DownwardAPI:             true
QoS Class:                   Burstable
Node-Selectors:              <none>
Tolerations:                 node.kubernetes.io/not-ready:NoExecute op=Exists for 300s
                             node.kubernetes.io/unreachable:NoExecute op=Exists for 300s
Events:
  Type    Reason     Age    From               Message
  ----    ------     ----   ----               -------
  Normal  Scheduled  2m24s  default-scheduler  Successfully assigned default/app-6f57fc7d5c-rcw8t to ip-10-99-22-103.ap-northeast-1.compute.internal
  Normal  Pulling    2m24s  kubelet            Pulling image "alpine:latest"
  Normal  Pulled     2m22s  kubelet            Successfully pulled image "alpine:latest" in 1.614786615s
  Normal  Created    2m22s  kubelet            Created container app
  Normal  Started    2m22s  kubelet            Started container app
次にpodの数を5台に変更します。この段階でスペックが足りなくなり新たにノードが起動する想定です。
$ kubectl scale deploy app --replicas 5
deployment.apps/app scaled


$ kubectl get pod
NAME                                               READY   STATUS    RESTARTS   AGE
app-6f57fc7d5c-4kg56                               1/1     Running   0          21s
app-6f57fc7d5c-dj2d6                               0/1     Pending   0          21s
app-6f57fc7d5c-rcw8t                               1/1     Running   0          3m6s
app-6f57fc7d5c-v6c6j                               0/1     Pending   0          21s
app-6f57fc7d5c-x2kjq                               0/1     Pending   0          21s
datadog-agent-5vx8r                                3/3     Running   0          7d18h
datadog-agent-5xrdf                                3/3     Running   0          7d18h
datadog-agent-cluster-agent-85cf48cf-77kkh         1/1     Running   0          7d18h
datadog-agent-f9zfj                                3/3     Running   0          7d18h
datadog-agent-kube-state-metrics-fb456b9bf-jbdnw   1/1     Running   0          14d
podの数を5台に変更した直後は、podが2台起動していない状態になっています。起動していないpodをdescribeしEventを確認したところ、 Insufficient cpuとなっており、スペック不足で起動できていない事がわかります。
$ kubectl describe pod app-6f57fc7d5c-sppfz
Name:           app-6f57fc7d5c-sppfz
Namespace:      default
Priority:       0
Node:           <none>
Labels:         app.kubernetes.io/name=app
                pod-template-hash=6f57fc7d5c
Annotations:    kubernetes.io/psp: eks.privileged
Status:         Pending
IP:
IPs:            <none>
Controlled By:  ReplicaSet/app-6f57fc7d5c
Containers:
  app:
    Image:      alpine:latest
    Port:       <none>
    Host Port:  <none>
    Command:
      sh
      -c
      sleep infinity
    Requests:
      cpu:        1
      memory:     2Gi
    Environment:  <none>
    Mounts:
      /var/run/secrets/kubernetes.io/serviceaccount from kube-api-access-2fv8f (ro)
Conditions:
  Type           Status
  PodScheduled   False
Volumes:
  kube-api-access-2fv8f:
    Type:                    Projected (a volume that contains injected data from multiple sources)
    TokenExpirationSeconds:  3607
    ConfigMapName:           kube-root-ca.crt
    ConfigMapOptional:       <nil>
    DownwardAPI:             true
QoS Class:                   Burstable
Node-Selectors:              <none>
Tolerations:                 node.kubernetes.io/not-ready:NoExecute op=Exists for 300s
                             node.kubernetes.io/unreachable:NoExecute op=Exists for 300s
Events:
  Type     Reason            Age   From                Message
  ----     ------            ----  ----                -------
  Warning  FailedScheduling  33s   default-scheduler   0/3 nodes are available: 3 Insufficient cpu.
  Normal   TriggeredScaleUp  28s   cluster-autoscaler  pod triggered scale-up: [{eks-ios-eks-nodegroup-20220414-34c013a0-a89b-65f0-2406-511509594bfb 3->4 (max: 4)}]
1分強待ったところ、Podが起動しました。
$ kubectl describe pod app-6f57fc7d5c-dj2d6
Name:         app-6f57fc7d5c-dj2d6
Namespace:    default
Priority:     0
Node:         ip-10-99-22-66.ap-northeast-1.compute.internal/10.99.22.66
Start Time:   Fri, 27 May 2022 03:03:12 +0000
Labels:       app.kubernetes.io/name=app
              pod-template-hash=6f57fc7d5c
Annotations:  kubernetes.io/psp: eks.privileged
Status:       Running
IP:           10.99.23.240
IPs:
  IP:           10.99.23.240
Controlled By:  ReplicaSet/app-6f57fc7d5c
Containers:
  app:
    Container ID:  containerd://02e56b4bf4d78e781caf650de397a1a056d1a1aea77015775ff27aef7e96d2fc
    Image:         alpine:latest
    Image ID:      docker.io/library/alpine@sha256:686d8c9dfa6f3ccfc8230bc3178d23f84eeaf7e457f36f271ab1acc53015037c
    Port:          <none>
    Host Port:     <none>
    Command:
      sh
      -c
      sleep infinity
    State:          Running
      Started:      Fri, 27 May 2022 03:03:53 +0000
    Ready:          True
    Restart Count:  0
    Requests:
      cpu:        1
      memory:     2Gi
    Environment:  <none>
    Mounts:
      /var/run/secrets/kubernetes.io/serviceaccount from kube-api-access-bz7st (ro)
Conditions:
  Type              Status
  Initialized       True
  Ready             True
  ContainersReady   True
  PodScheduled      True
Volumes:
  kube-api-access-bz7st:
    Type:                    Projected (a volume that contains injected data from multiple sources)
    TokenExpirationSeconds:  3607
    ConfigMapName:           kube-root-ca.crt
    ConfigMapOptional:       <nil>
    DownwardAPI:             true
QoS Class:                   Burstable
Node-Selectors:              <none>
Tolerations:                 node.kubernetes.io/not-ready:NoExecute op=Exists for 300s
                             node.kubernetes.io/unreachable:NoExecute op=Exists for 300s
Events:
  Type     Reason            Age                   From               Message
  ----     ------            ----                  ----               -------
  Warning  FailedScheduling  2m48s                 default-scheduler  0/3 nodes are available: 3 Insufficient cpu.
  Warning  NetworkNotReady   99s (x18 over 2m13s)  kubelet            network is not ready: container runtime network not ready: NetworkReady=false reason:NetworkPluginNotReady message:Network plugin returns error: cni plugin not initialized
  Normal   Pulling           96s                   kubelet            Pulling image "alpine:latest"
  Normal   Pulled            92s                   kubelet            Successfully pulled image "alpine:latest" in 4.209940672s
  Normal   Created           92s                   kubelet            Created container app
  Normal   Started           92s                   kubelet            Started container app
スペックが足りていない分、新しく3台ワーカーノードが作成されていることも確認できました。
$ kubectl get node
NAME                                              STATUS   ROLES    AGE    VERSION
ip-10-99-13-40.ap-northeast-1.compute.internal    Ready    <none>   42d    v1.22.6-eks-b18cdc9
ip-10-99-14-91.ap-northeast-1.compute.internal    Ready    <none>   2m6s   v1.22.6-eks-7d68063
ip-10-99-17-162.ap-northeast-1.compute.internal   Ready    <none>   2m6s   v1.22.6-eks-7d68063
ip-10-99-17-198.ap-northeast-1.compute.internal   Ready    <none>   42d    v1.22.6-eks-b18cdc9
ip-10-99-22-103.ap-northeast-1.compute.internal   Ready    <none>   42d    v1.22.6-eks-b18cdc9
ip-10-99-22-66.ap-northeast-1.compute.internal    Ready    <none>   2m6s   v1.22.6-eks-7d68063
nodeの起動時間は、最も早く起動したPodのFailedScheduling からCreatedまでの時間で算出したところ、1分16秒でした。
同様の条件で、ClusterAutoScalerを使ってnodeの起動時間を算出してみましたが、1分31秒でしたので、Karpenterのほうが15秒程度早いことが確認できました。
最後に
今回は、EKSでKarpenterを試した際の手順と検証について簡単にまとめました。
導入難易度も比較的簡単(1、2時間程度で導入可能)であり、Cluster Autoscalerと比較して、Nodeの追加時間が短い点やNode管理が柔軟で便利な点等の利点も多いことから、EKSのクラスターオートスケーラーツールとしては第一候補になるかなと考えております。
以上です。
-
PICK UP
ピックアップ
-
ピックアップコンテンツがありません
-
RANKING
人気の記事
-
-
1
Lambdaのマルチアカウントデプロイ 設計編
Lambdaのマルチアカウントデプロイ 設計編
2021/03/01
-
2

IAMを理解する第1回(機能編)
IAMを理解する第1回(機能編)
2020/01/30
-
3
AWS CloudFormationでBlueGr…
AWS CloudFormationでBlueGreenデプロイを実現してみた(…
2019/11/25
-
4

Azureのコスト情報をTeamsで通知する方法
Azureのコスト情報をTeamsで通知する方法
2023/06/14
-
5

DevOps、その遙かなる道程(第2回)
DevOps、その遙かなる道程(第2回)
2019/08/30
-
-
ARCHIVE
アーカイブ
-
- July 2024 (1)
- January 2024 (1)
- December 2023 (2)
- June 2023 (2)
- May 2023 (1)
- April 2023 (1)
- March 2023 (2)
- February 2023 (2)
- January 2023 (1)
- December 2022 (2)
- October 2022 (2)
- September 2022 (2)


